
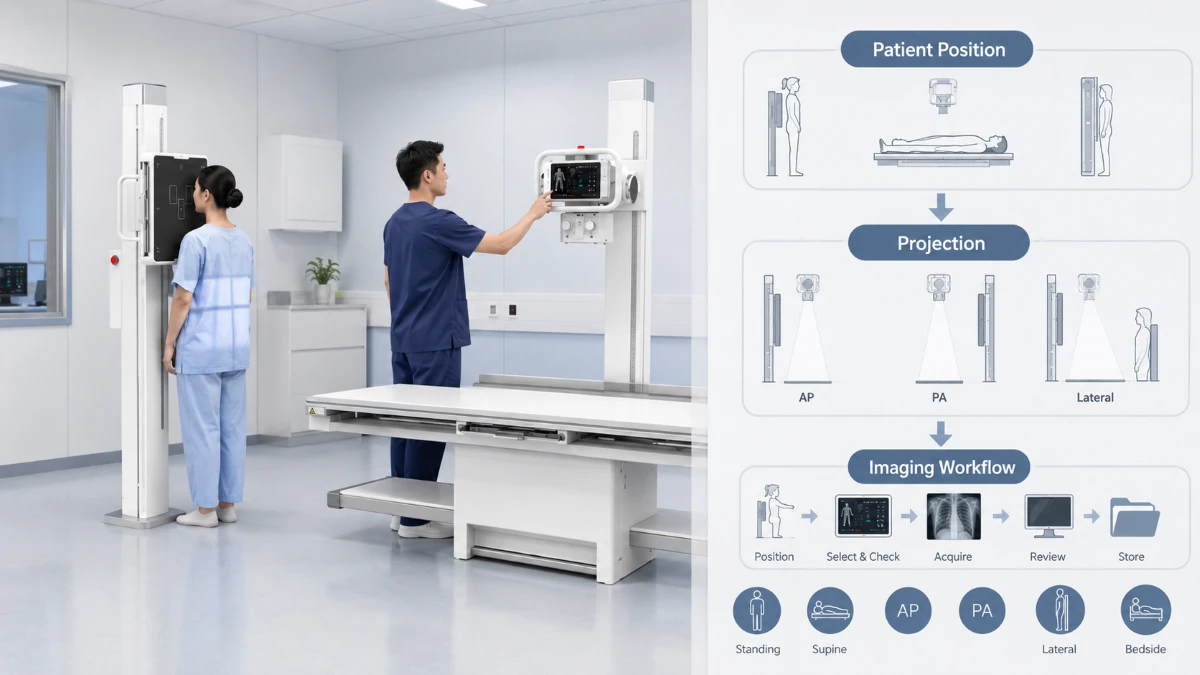
When a hospital plans an X-ray room or upgrades an imaging workflow, the positioning requirement is often different from one department to another. A general DR room may need to handle upright PA chest imaging in the morning and table-based abdomen, spine, or extremity examinations later the same day. An ICU workflow may depend on bedside AP chest imaging for patients who cannot be transferred safely. Orthopedic services may need standing full-spine or full-lower-limb alignment, while gastrointestinal or contrast studies may require fluoroscopy with controlled table movement and live observation.
These standard positions and clinical workflows place different demands on tube and detector travel, anatomical coverage, room geometry, and imaging mode. At Angell, our technical approach is to evaluate the examination workflow first, then match it with a system configuration that supports the required imaging tasks, including routine AP/PA and lateral radiography, bedside AP imaging, long-length alignment, special projections, fluoroscopy, and weight-bearing orthopedic assessment. Clinical positioning, exposure selection, and image-acceptance decisions should follow the examination request, local departmental protocol, the manufacturer’s instructions for the configured system, andrecognized radiography practice guidance.
Common patient positions include upright, standing, supine, prone, and decubitus positions, while common X-ray projections include AP, PA, lateral, and oblique projections. In clinical practice, these positioning choices are combined with the purpose of the examination, patient mobility, anatomical coverage, and the available imaging system.
Common X-ray Positions and Projections in Radiography
Before selecting an imaging system, it is important to distinguish between patient position and X-ray projection. Patient position describes how the patient is placed during the examination, while projection describes the direction of the X-ray beam relative to the patient and detector. Both factors influence the required room configuration, detector placement, and imaging workflow.
| Category | Common Examples | Description |
|---|---|---|
| Patient Position | Upright, standing, supine, prone, lateral decubitus | Describes how the patient is positioned relative to the table or detector |
| Projection | AP, PA, lateral, oblique | Describes the direction of the X-ray beam through the patient |
| Workflow Type | Bedside imaging, long-length imaging, fluoroscopy, weight-bearing imaging | Describes how the examination is completed based on patient condition and clinical requirements |
The exact positioning method, beam angle, centering point, source-to-image distance (SID), and exposure parameters vary according to the examination type, patient condition, equipment configuration, and local radiography protocol.
Pre-Exposure Radiographic Positioning Checklist
| Check | What to Confirm |
|---|---|
| Examination and patient | Examination request, patient identity, and laterality |
| Patient condition | Mobility, ability to stand or cooperate, motion risk, and fall risk |
| Position and projection | Patient posture, central-ray direction, and tube angle |
| Imaging geometry | Detector placement, centering, and source-to-image distance (SID) |
| Field and marker | Required anatomy, collimation, and side marker |
| Artifacts and instructions | Clothing, bedding, lines, tubes, medical devices, breathing instructions, and motion |
These checks support consistent setup, but image quality and radiation protection still depend on patient setup, exposure selection, detector configuration, and departmental protocol. For radiation safety, departments should follow recognizedmedical X-ray guidance and local clinical policy.
Routine Upright, Supine, and Table-Based AP/PA/Lateral Positions
Routine radiography usually starts with a practical positioning question: can the patient stand, sit, lie supine, or remain on a stretcher or wheelchair? Upright PA or AP chest imaging, supine AP abdomen imaging, AP/lateral spine work, and extremity projections all require stable tube-detector geometry and repeatable setup.
| Exam | Typical Patient Position and Projection | Key positioning point |
|---|---|---|
| Chest | Upright PA or AP projection | Patient alignment, shoulder rotation, lung coverage |
| Abdomen | Supine; AP projection | Centering, detector placement, artifact control |
| Spine | Supine or upright as requested; AP and lateral projections | Alignment and complete anatomical coverage |
| Extremity | Table or Bucky workflow, anatomy-specific projection | Joint inclusion and correct projection angle |
In this context, our MTP Series fits routine rooms that need to switch between upright, supine, lateral, oblique, stretcher, and wheelchair radiography. Tube-detector auto-tracking and under-table Bucky travel help support efficient repositioning across common general radiography views during the same shift.
Bedside AP and Limited-Mobility Supine Positions
Bedside AP imaging is defined by patient limitation rather than room design. The detector may need to be placed behind the patient while tube angle, lung-apex coverage, patient rotation, oxygen lines, drainage tubes, and monitoring equipment are checked before exposure.
Our Lingxi Series is used for emergency and bedside mobile dynamic DR workflows when the patient cannot be transferred safely. In configured emergency and bedside workflows, Lingxi Series can support dynamic observation, high-resolution imaging, and image-based support for PICC, infusion-port, airway, or endotracheal intubation placement-verification workflows. These applications should be confirmed against the installed configuration, examination request, and departmental protocol before clinical use.
Typical bedside positions include AP chest, supine abdomen, and portable extremity imaging. These views may look simple in a positioning chart, but in practice the technologist often works around patient pain, limited rotation, oxygen delivery, monitors, bedding, drainage tubes, or infusion lines.
For bedside AP chest imaging, the technologist should confirm detector height and centering before moving the tube into position. Lung-apex coverage, patient rotation, tube angle, and overlap from lines, tubes, bedding, or monitoring devices should be checked before exposure. For supine abdomen or portable extremity work, the priority is to include the required anatomy while avoiding unnecessary patient movement.
Low-Position, Pediatric Standing, and Multi-Angle Limb Positions
Low-position and pediatric standing examinations often fail because access is limited, not because the projection itself is unusual. The patient may be short, unable to cooperate fully, or difficult to reposition, so the system must bring the tube and detector to the anatomy rather than asking the patient to repeatedly adjust posture.
With 4D 10-axis synchronized motion, dynamic/static detector switching, and low-profile imaging, our QOMO Series can lower the detector and tube near ground level for multi-angle lower-limb radiography, pediatric standing, and limb examinations.
In these workflows, coordinated tube-detector travel is the key positioning value. It supports standing chest AP/PA, lower-limb alignment, pediatric extremity imaging, and multi-angle limb positioning when room geometry and patient mobility limit a conventional fixed setup.
Standing Full-Spine, Full-Lower-Limb, and Recumbent Long-Field Positions
Full-spine and full-lower-limb imaging require more than routine AP or lateral positioning. Posture, foot placement, knee position, pelvis symmetry, shoulder level, and full anatomical coverage should be checked because a small change in standing alignment can affect the long-length image.
The Changfeng Series is a full-length ceiling-mounted DR system built for this long-length positioning workflow. Its proprietary 47-inch large-format detector is specified for single-exposure full-spine and full-lower-limb imaging when the patient can stand safely and maintain alignment.
For an orthopedic buyer, the decision can be framed in three questions: Can the patient stand safely? Does the exam require full-spine or full-lower-limb coverage in one exposure? If standing is unsafe, does the department need recumbent long-field imaging or angular stitching instead? This turns the positioning limitation into a system requirement rather than a general preference.
Special Projection Positions: Waters, Patella Axial, Calcaneal Axial, and Cross-Table Lateral
Special projection positioning starts with angle control. Waters view, patella axial, calcaneal axial, and cross-table lateral views often require a controlled relationship between patient posture, central ray, detector angle, and whether the patient can rotate safely.
Waters view depends on controlled head and neck extension. Patella axial positioning may require cranial angulation around 15-20 degrees, while calcaneal axial imaging may require a larger cranial beam angle; exact positioning should follow local protocol. Cross-table lateral views are useful when selected trauma or limited-mobility patients should not be rotated.
Our DTP580 Series fits this workflow because both the detector and horizontal arm can rotate for special projections such as Waters view, patella axial view, calcaneal axial view, and cross-table lateral view. For trauma, orthopedic, occupational-health, and special examination workflows, the practical value is that equipment geometry can compensate when patient rotation is painful, unsafe, or clinically inappropriate.
Table-Based Fluoroscopy, Contrast, and Long-Length Stitching Positions
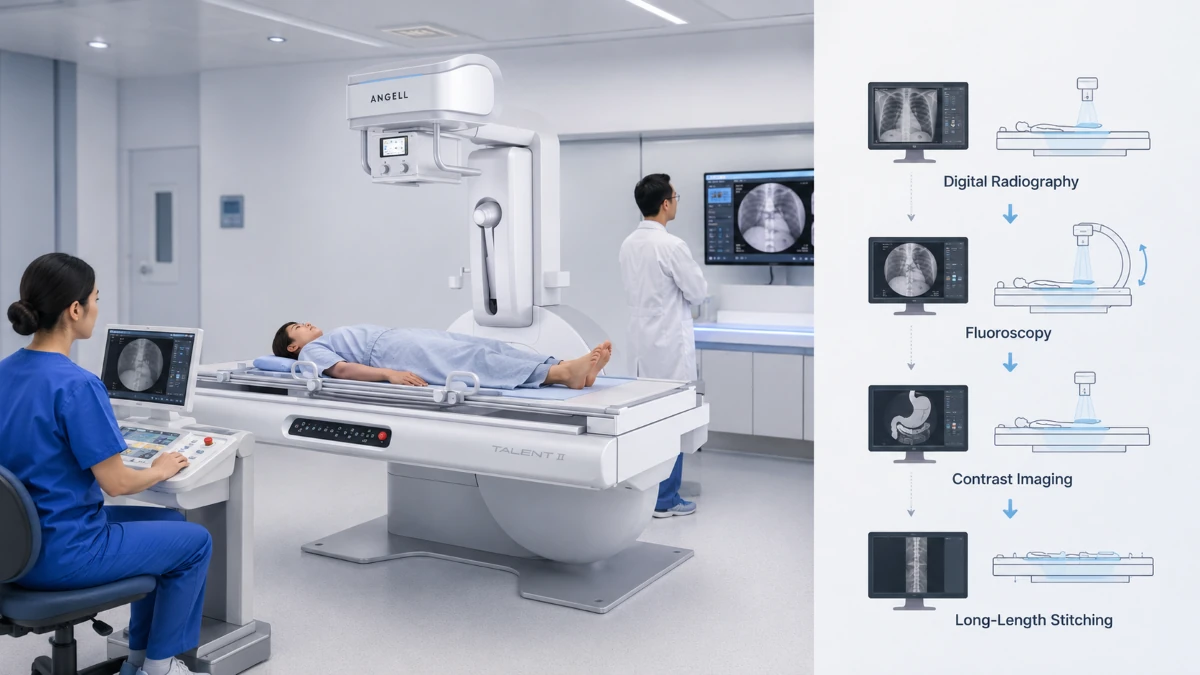
Table-based fluoroscopy differs from static radiography because positioning can continue during the examination. In gastrointestinal or contrast-related studies, the patient may need to turn, swallow, hold still, or move between standing and recumbent positions while the clinician observes motion or contrast passage. Our Talent II Series supports this R/F room workflow by combining digital radiography, digital fluoroscopy, contrast imaging, and slit-scanning stitching.
For long-length coverage, the slit-scanning workflow supports standing and recumbent full-spine/full-lower-limb imaging beyond a standard DR field of view. A removable grid option may support selected pediatric or gynecological examinations where a lower-dose acquisition approach is clinically appropriate, but its use should depend on the configured system, examination type, patient size, exposure settings, and departmental protocol.
If the exam is limited to static AP, PA, or lateral radiography, a standard DR room may be sufficient. Talent II becomes more relevant when the selection factor is imaging mode: real-time fluoroscopy, controlled table movement, contrast observation, or long-length stitched acquisition in the same R/F environment.
For buyers, this section should answer one operational question: does the department need only a still image, or does it need to watch the examination happen? GI contrast studies, selected urology or gynecology contrast procedures, and orthopedic long-length stitching each depend on different table movement and patient-positioning requirements.
Weight-Bearing Standing Positions for Spine, Lower Limb, Hip, Knee, and Ankle
Weight-bearing positioning is selected when the clinical question depends on how anatomy behaves under load. Neutral standing posture, full-lower-limb alignment, standing spine assessment, and selected hip, knee, ankle, or foot workflows all start with one safety check: can the patient stand and remain stable long enough for acquisition?
WR-3D is positioned for weight-bearing 3D X-ray assessment of the spine, lower limb, hip, knee, and ankle. It also supports standing weight-bearing acquisition and volumetric reconstruction in coronal, axial, and sagittal planes, with AI-assisted measurement available for selected orthopedic assessment workflows where configured.
For departments that also need 2D imaging functions on the same platform, WR-3D can support 2D radiography, image stitching, fluoroscopy, and contrast-study workflows where configured. Optional AI measurement, PACS output, and 3D printing-related outputs should be described only when they are part of the installed configuration and clinical workflow.
Standard weight-bearing positions include neutral standing, full-lower-limb alignment, and standing spine assessment. If the patient cannot bear weight safely, a non-weight-bearing or recumbent imaging workflow may be more appropriate than forcing the standing position.
Weight-bearing 3D should be framed as a selected orthopedic positioning workflow, not a replacement for CT or MRI. Modality choice should follow the clinical question, available imaging protocol, and physician judgment.
Choosing the Right X-ray System by Positioning Need
| System | Typical Workflow | Suitable When | Main Selection Factor |
|---|---|---|---|
| MTP | Routine upright and table-based radiography | Routine radiography | Stable room geometry and routine exam mix |
| Mobile Dynamic DR / Lingxi | Bedside AP and limited-mobility imaging | ICU, emergency, bedside imaging | Patient mobility and bedside access |
| QOMO | Standing chest, pediatric extremity, lower-limb alignment, multi-angle positioning | Flexible positioning | Tube-detector travel, low-position access, and room flexibility |
| Changfeng | Full-spine, full-lower-limb, recumbent long-field | Orthopedic alignment | Anatomical coverage and ability to maintain standing alignment |
| DTP580 | Waters, patella axial, calcaneal axial, cross-table lateral | Special projections | Projection angle, detector rotation, and patient rotation limits |
| Talent II | R/F workflows with fluoroscopy, contrast imaging, and long-length stitching | GI and contrast studies | Imaging mode: static radiography vs fluoroscopy/live observation |
| WR-3D | Weight-bearing 3D assessment with integrated 2D imaging workflows | Orthopedic load-bearing assessment | Need for standing weight-bearing assessment and 3D reconstruction |
After the standard position is identified, the next question is what limits the examination: patient mobility, anatomical coverage, imaging mode, room geometry, or weight-bearing need. These factors determine whether a routine DR system, mobile solution, R/F table, long-length imaging system, or weight-bearing 3D platform is appropriate.
At Angell, we view positioning as part of the complete imaging workflow. Our technical team evaluates examination requirements, room configuration, patient-mobility limits, and system capabilities together. If your department is planning a new DR room, bedside imaging workflow, fluoroscopy room, or orthopedic positioning setup, you can contact Angell with your examination mix, room constraints, and required positioning workflows so we can help match the system configuration to the clinical scenario.
FAQ
What X-ray system is suitable for bedside AP positioning?
A mobile DR system is suitable for bedside AP positioning because it can be moved to ICU, emergency, pediatric, or ward patients who cannot transfer safely. Angell’s Mobile Dynamic DR Systems are designed for bedside and emergency portable radiography.
What is the difference between a patient position and an X-ray projection?
A patient position describes how the patient is placed, such as upright, supine, prone, or lateral decubitus. A projection describes the direction of the X-ray beam, such as AP, PA, lateral, oblique, axial, or tangential. The required combination depends on the anatomy, clinical question, patient mobility, and departmental protocol.
What are the standard X-ray positions in conventional radiography?
Common standard X-ray positions include upright, supine, prone, lateral, and decubitus positions. These positions are often combined with projections such as AP, PA, lateral, and oblique depending on the anatomy and clinical purpose. The required positioning also depends on patient mobility, examination protocol, and the available imaging system.
How does positioning reduce repeat X-ray images?
Positioning reduces repeats by improving centering, limiting rotation, keeping anatomy within the field, reducing motion, and supporting proper collimation. A short pre-exposure check of the marker, image receptor, central ray, SID, collimation, and patient instruction can reduce the likelihood of avoidable retakes.
When should a hospital consider mobile, dynamic, or long-length DR systems?
A mobile DR system is useful for ICU, emergency, pediatric, and bedside imaging. Dynamic DR can support selected motion or positioning confirmation workflows. Long-length DR is useful when full-spine or full-lower-limb imaging requires simpler alignment and fewer stitching steps.
References
FDA Medical X-ray Imaging
FDA Fluoroscopy
ASRT Practice Standards